Taming POV-Ray - Part 0: Fundamentals
by G. Moran, 10 Feb 2022
So you want to get into 3D graphics, and maybe try using POV-Ray if you dare? You came to the right place. I was in your shoes about a year ago, and it took me quite some time to find the information I needed and learn it, before I went on and created the art you saw on your way here... Now I'm gonna pass onto you the knowledge and experience I gained, hopefully in the simplest way possible, so you too can create 3D art regardless of your background. It's not as intimidating as you may think. There's a learning curve, sure, but once you get over the basics it becomes progressively easier. You'll see...
This article will cover the fundamentals of 2D, which you need to learn before jumping into the world of 3D.
Table of contents
The Grid

Imagine an empty room with a checkered floor, like a giant chess board. The floor tiles are all identical, perfect squares, only alternating in color between black and white. The room is initially empty...
A woman wearing a purple dress enters the room and stands near the north wall, we'll call her Alice. A man in a blue suit follows her into the room and stands near the east wall, we'll call him Bob. Alice and Bob have each chosen a different floor tile to stand on, such that their feet are exactly in the center of their respective tiles... Near the south west corner of the room, a rectangular Oak table is placed. The 2D view of the room from the top looks something like this:
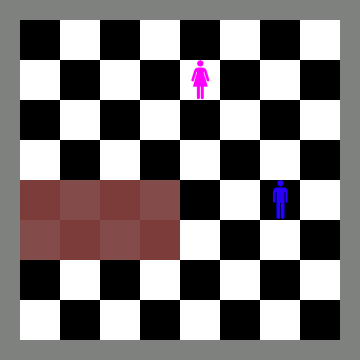
Looking at the floor tiles with people and objects on them, we can deduce things like position, distance, and size. For example:
- The room is 8 tiles wide and 8 tiles long, or 8 x 8 tiles squared.
- Alice is standing 2 tiles west and 3 tiles north of Bob.
- Bob is standing about 1.5 tiles away from the east wall of the room.
- The table is 4 tiles wide and 2 tiles long.
The checkered floor turned out to be quite useful! That's because it's something called a "grid"; an area that is divided into many identical cells, where each cell is (typically) a square. So our checkered floor is a 2D grid, and its cells are the black and white tiles. The grid cell is used as a unit of measurement, so to measure the table in our room using the tiles as units, we can simply say that the table is 4 units wide and 2 units long. Similarly, the room is 8 units wide and 8 units long.
When it comes to measuring positions, it's useful to measure relative to a common reference point. We're going to place a point at the at the south west corner of the room and use it as reference, this point is called the "origin". Now to find the position of any object we will measure how far east and how far north it is from the origin, then we're going to write these 2 numbers in that order between brackets. These numbers are called the "coordinates".
Placing points where Alice, Bob, and the table's corners are gives us this 2D view:
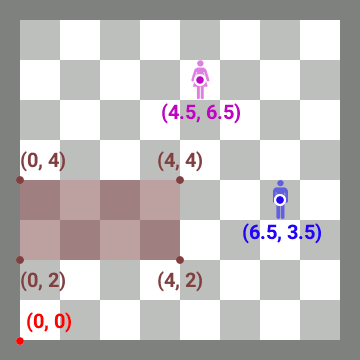
- Alice is standing at
(4.5, 6.5), or in other words, Alice's coordinates are(4.5, 6.5). That's 4.5 units east and 6.5 units north of the origin. Similarily, Bob's coordinates are(6.5, 3.5). - The table's corners are at
(0, 2),(0, 4),(4, 4), and(4, 2). Those are the south west, north west, north east, and south east corners respectively. - The south west corner of the room is at
(0, 0), the north west corner is at(0, 8), the north east corner is at(8, 8), and the south east corner is at(0, 8).
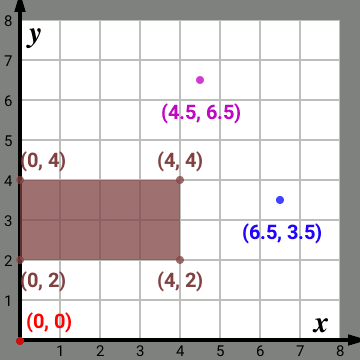
The Coordinate System
Now that we know what a 2D grid is, what an origin is, and how to write coordinates, let's standardize our system... Instead of using an imaginary compass with terms like east/west and north/south, we'll draw two imaginary rulers extending infinitely out of the origin. These rulers are called the "axes"; first comes "the x axis" extending from the origin towards the east, and then comes "the y axis" extending from the origin towards the north. The 2 axes are perfectly perpendicular and only cross at the origin... Now we can easily find out the coordinates of any object by noting its position relative to the 2 axes; we'll check how far along x (east) and how far along y (north) is the object located, then write the first number as the x coordinate and the second number as the y coordinate between brackets.
This system with the 2 axes is called the "coordinate system". Let's draw a new grid with the x and y axes then put Alice, Bob, and the table on it:
I previously mentioned that the x axis extends from the origin to the east, but that's not the whole truth. The axis extending from the origin to the east is actually called the positive x axis, or +x for short, and that's only half of the complete x axis. The other half is called the negative x axis, or -x for short, and it extends from the origin to the west. The complete x axis is comprised of both a positive part and a negative part... Any object that lies east of the origin is given a positive x coordinate, and any object that lies west of the origin is given a negative x coordinate. If you placed a point 1 unit east and one unit north of the origin then its coordinates will be (+1, +1) or more simply (1, 1), while a point placed 1 unit west and one unit north of the origin will have the coordinates (-1, 1).
As you've probably guessed, the y axis is also made up of two halves; the positive y axis or +y extending from the origin to the north, and the negative y axis or -y extending from the origin to the south. Objects north of the origin get a positive y coordinate, while objects south of the origin get a negative y coordinate.
Let's add the negative parts of the axes to our new grid, and place more points while we're at it:
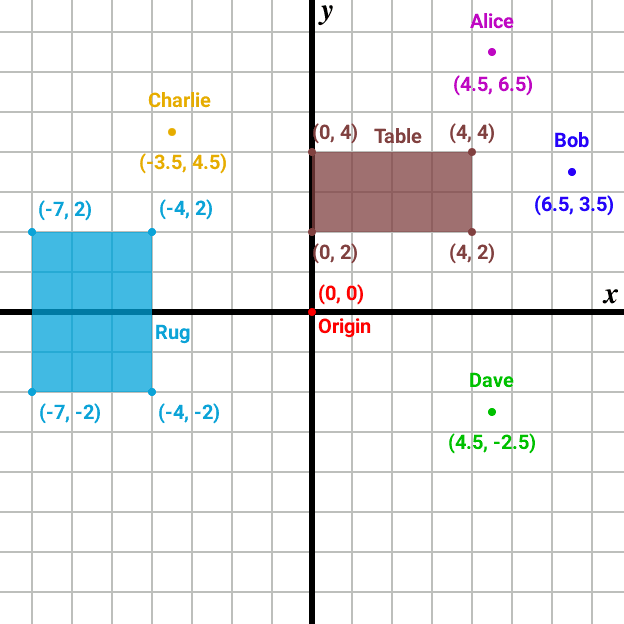
We now have new people in our infinite 2D world, and a rug. Let's write down their coordinates:
- Charlie's coordinates are
(-3.5, 4.5). That's 3.5 units west and 4.5 units north of the origin. Dave's coordinates are(4.5, -2.5)which is 4.5 units east and 2.5 units south of the origin. - The rug's corners are at
(-7, 2),(-4, 2),(-4, -2),(-7, -2). The rug is placed fully along the negativexaxis, but has corners along both the positive and negativeyaxes.
Basic 2D Shapes
There are many shapes that we can draw in our 2D world, let's go over some of the most common ones and learn how to denote them.
Point
The point is the most basic shape we have, except it's not a "shape" in the literal sense because it doesn't have a width or height, and doesn't occupy any real space. Points are represented by dots, simply to mark a certain location on a grid.
We denote a point by a single pair of coordinates, for example (4, 1).

Line
A line is a straight connector between 2 points. It doesn't have a width or height or thickness, and doesn't occupy any real space.
We denote a line by 2 pairs of coordinates, corresponding to the 2 points that connect to form it, for example (4, 1) , (0, 3).

Triangle
The triangle is the first basic shape we have that occupies real space, or in other words, it has a measurable area. A triangle is made up of 3 points connected to each other by straight lines, and every point is directly connected to the other 2. The triangle is a "closed" shape, because it's completely surrounded by lines without gaps, we call those lines "edges" because they are drawn exactly where the shape ends.
We denote a triangle by 3 pairs of coordinates corresponding to its 3 points, for example (4, 1) , (0, 3) , (3, 4).

Rectangle
A rectangle is another closed shape made up of 4 different points connected to each other by straight lines, however every point is directly connected to only 2 other points. The 4 edges that make up the rectangle are divided into 2 horizontal edges and 2 vertical edges.
We denote a rectangle by 4 pairs of coordinates, corresponding to its 4 points in an order that creates a closed shape, for example (0, 1) , (0, 3) , (4, 3) , (4, 1). This gives us the south west, north west, north east and south east points respectively.
An alternative notation for a rectangle is only 2 pairs of coordinates, such that the coordinates correspond to 2 points that are opposite to each other. For example (0, 1) , (4, 3), which gives us our south west and north east points respectively. Note that the x coordinate is different across the two pairs, and same for the y coordinate. This alternative notation is more compact and less error-prone, so we will be using it from now on.

Circle
Circles are a little tricky, because they are only represented by a single point and a number called the "radius". Circles are closed and occupy real space, but have no edges.
We start with a point that's gonna be the center of the circle, then we choose a number that's pretty much how "big" our circle is gonna be, we'll call that number the radius. Then, with a virtual pen, we draw a circular outline around the center point, such that the pen remains away from the center point by the length of the radius... This roughly means that if we measure the distance from the center point to any other point exactly on the outline of the circle, that distance will always be equal to the radius.
We denote a circle by a pair of coordinates for the center point and a single radius value, for example (4, 3) , 2.

Bézier Curve
A curve in general is a non-straight line, a "bent" line, if you will. Like the straight line it has no width, height, or thickness. There are many different ways to represent a curve, but we'll only briefly cover one; the cubic Bézier curve.
A cubic Bézier curve is represented by 4 points; the 1st and 4th points are where the curve starts and ends, and the 2nd and 3rd points control the shape of the curve. A cubic Bézier curve will always pass through the 1st and 4th points, but only rarely pass through the other 2 points. You can experiment with drawing cubic Bézier curves using the path tool in GIMP, or the equivalent tool in other image manipulation programs.
We denote a cubic Bézier curve by 4 pairs of coordinates in the order specified above, for example (1, 0) , (2, 4) , (4,-1) , (6, 2). That's 1 start point, 2 control points, then 1 end point.

Side note: the cubic Bézier curve is drawn using a certain mathematical formula that interpolates between the 4 control points. You don't need to learn this formula to draw Bézier curves, but if you want to, read this page or this page.
Transformations in 2D
Time to mess with shapes! This part is more challenging than all the above, so take your time to fully understand it.
Translation
Translating means moving or displacing an object, by specifying the change in units along the x axis and the y axis. We denote translation using something called a "translation vector" which is written exactly like a pair of coordinates; two numbers in brackets. By adding the first number to an object's x coordinate, and the second number to the object's y coordinate, we get the object's new position. For example:
- A point at
(3, 2)translated by(3, 2)will move to(6, 4), which is the result of(3+3, 2+2). - A point at
(-2,-1)translated by(-2,-4)will move to(-4,-5), which is the result of(-2-2, -1-4).

Scaling
Scaling is basically enlarging or shrinking an object, by some amount called the "factor". A scaling factor is how much we're enlarging or shrinking an object; if the factor is more than 1 then the object will be enlarged, if the factor is less than 1 but more than 0 then the object will be shrunk, and if the factor is 1 then the object's size won't change. So scaling an object by a factor of 2 will double its size, and scaling it by 0.5 will halve its size. Simple stuff, right? Just remember that you cannot scale by a factor of 0.
To find the new dimensions of an object after scaling, multiply its current dimensions by the factor. For example:
- A circle with a radius of 2 scaled by a factor of 2 will have a radius of 4.
- A circle with a radius of 2 scaled by a factor of 0.5 will have a radius of 1.

So far we have been scaling by a 1D factor that is a single number, but we can also scale by a 2D factor that specifies two individual factors for x and y. So a 1D factor of (2) is equivalent to a 2D factor of (2, 2), such that it scales objects by 2 in x and by 2 in y. When the x and y factors are equal then this is "uniform" scaling, which is what we've been doing. On the other hand if the x and y factors are different then this is "non-uniform" scaling, which will cause objects to be stretched.

Scaling always happens around the origin, so if you center an object around the origin and scale it by 2, then it will double in size and remain centered around the origin. However if you place an object away from the origin and scale it by 2, then it will double in size and the distance between it and the origin will also double.

To avoid moving an object by scaling it you must first translate it to the origin, scale it, then translate it back to its original position. Like this:

By the way, you can scale by a negative factor! The result is the exact same as with a positive factor but the object is flipped or "inverted". If you scale by a negative factor in x the object will be mirrored, and if you scale by a negative factor in y the object will be upside down. If you scale by a negative factor in both x and y then the object will be mirrored and upside down.

Rotation
Rotation is the last transformation we will cover. It is also the trickiest, so we will forego most of the math and try to gain an intuition for how rotation works using clocks.
Imagine any non-digital clock with 2 hands, where the hour hand is pointing at 2 and the minute hand is pointing at 12. After a quarter of an hour, the minute hand will have rotated and will be pointing at 3, another quarter of an hour and the hand will be pointing at 6, then at 9, then back at 12 again after a full hour had passed.

So what happened exactly? The minute hand rotates around the center of the clock, and after the passing of every hour the hand makes a "full" rotation and goes back to where it started, and the process repeats. Let's quantify all this rotation; whenever a hand makes a "full" rotation it takes 360 "steps", if it makes half of a full rotation it takes 180 "steps" (360/2), and if it makes a quarter of a full rotation it takes 90 "steps" (360/4) and so on. You see where I'm going with this?
Those "steps" are actually called "degrees", and a "rotation of N degrees" is called an "angle". Whereas a clock has 12 hours marked on it, a circle has 360 degrees. So the minute hand rotates by an angle of 90 degrees to go from 12 to 3, then rotates by another angle of 90 degrees to go from 3 to 6, having now rotated a total of 180 degrees, then by rotating another angle of 180 degrees it reaches 12 again and completes a 360 degree rotation...

But wait, if a full rotation is 360 degrees, does that mean that the next full rotation is 720 degrees, and the next 1080 and so on? Technically yes, but by convention we reset the counter to 0 after completing 360 degrees. So we count 1, 2, 3, ..., 357, 358, 359, 0, 1, 2, 3...etc.
So far all our rotation has been clockwise (i.e. in the same direction the clock hands rotate), but we can also rotate in the "opposite" direction; anti-clockwise. When we do this the angle keeps decreasing, and when it decreases below zero it becomes negative.

Because of the circular nature of angles, every negative angle has an equivalent positive angle, and vice-versa. For example +90 is the same as -270, while +225 is the same as -135, and -180 is the same as +180... A positive angle and its equivalent negative angle, without the negative sign, will always add up to 360. For example 90 + 270 = 360, and 180 + 180 = 360.
Going back to the clock, we're going to stick two pins on the minute hand; one pin closer to the center of the clock, and another pin far from the center of the clock. After some time has passed and both pins have rotated by the same angle, where will each pin end up?

Sure enough, the pin closer to the center has barely moved, while the pin far from the center has moved an awful lot. That's because objects travel a longer distance the farther they are from the center of rotation, which in our case is the center of the clock.
Now it's time to standardize our system yet again. In the coordinate system the center of rotation is always the origin, just like the center of the clock. Any rotation will cause objects placed near the origin to travel shorter distances, and objects placed far from the origin to travel longer distances.

So what if we want to rotate an object around a different point than the origin, for example the object's center point? In that case we translate that point to the origin, do the rotation, then translate it back to its original position.
For example if there's an object at (5, 0) and we want to rotate it by 45 degrees around the point (5, 0), then we have to first translate the object by (-5, 0), rotate the object by 45 degrees, then translate the object by (5, 0).

Wrapping Up
You should now know what the coordinate system is, how to place 2D shapes on it, and how to transform said shapes. In the next article we'll build on everything we learned here by adding a third axis to the coordinate system and diving head first into the 3D world. We will also render our first scene using POV-Ray! You might want to get a headstart and download POV-Ray 2.2 (Windows/Linux) in preparation for next time.